Tampilkan postingan dengan label Modeling and Painting. Tampilkan semua postingan

The Face of Evil

I've been bouncing back and forth between projects and took some time to work on Nagash a little more. This model has been on my desk for five months; at this rate the End Times will be over before I finish him!
 

Resculpting Nagash's head has been a stumbling block keeping me from making any further progress, but I finally tackled it and gave the big guy a properly proportioned noggin.

The classic metal bone giant head served as the starting point. It is scaled to Nagash's body and just needed its jaws resculpted.


After clipping away the old jaw, I sculpted new teeth. I initially sculpted the mouth closed, but the skull was so bland and expressionless that I cut the mouth apart and reworked it to have an open jaw. I also sculpted a frown to give Nagash appropriately "angry" eye sockets.


The crown portion of the hat required a little widening to fit around the eye sockets. This was accomplished by slicing away some of the plastic above the eyes.


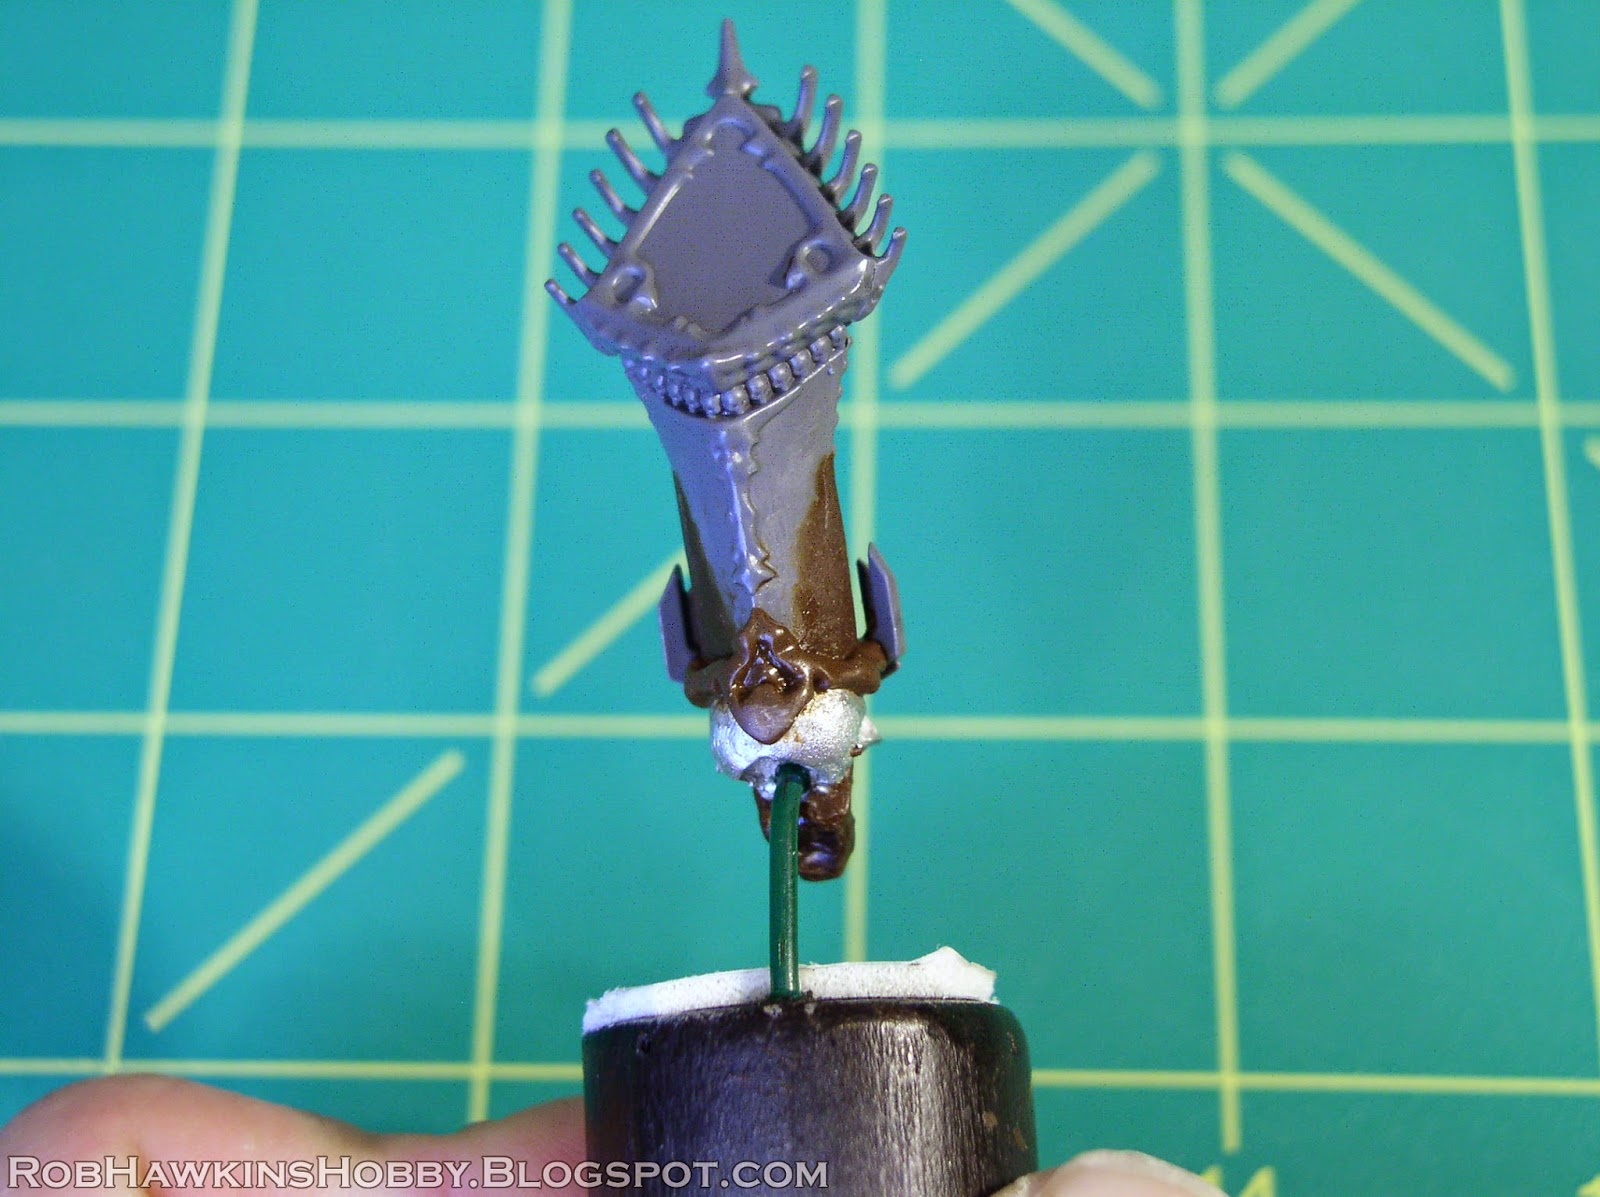
The hat was cut away from the original head, and I widened it with some putty. In this shot, the putty hasn't been smoothed yet; I'm just checking the fit and angle of the hat on Nagash's head.


The putty on the hat was smoothed and allowed to cure, and then I glued it in place and sculpted the bone frame around the base of the hat.


Here you can really see the difference between the original, tiny head and the new head. (Without the mass of the hat to bulk it up, the tiny skull really looks ridiculous.)  I added some plastic card mandible plates on the side of the head. They are scaled up a little, but match the shape and style of the original.


The final steps were to position the head and smooth over the neck join. I broke the putty apart to allow me to paint the head separately. I also attached the hanging strips and sculpted the transition up to where they connect to the hat.


A cabeza fit for a king! The only items left on this model are the books and basing and then I can finally start painting.


'Til next time!

Modeling and Painting: the Garden of Morr

The Garden of Morr has been sitting on my Shelf of Shame™ for more than two years, waiting to be painted. I had done a post about the assembly, which focused on the added ground texture and a few other details like articulating the gate and coffin lid. Check that out here:


Painting the Garden of Morr


After spraying the entire set with black primer, I drybrushed all of the stonework with Formula P3 Greatcoat Grey, and then applied successively lighter drybrushes using a mix of Greatcoat Grey and Army Painter Ash Grey. The final drybrush application was straight Ash Grey on the edges and high points.


To create a variety in the stone pattern, I went through and washed a few individual stones with brown ink and washed some others with GW Shadow Grey (aka The Fang).


With the stonework completed, I carefully painted all of the sand and bones with GW Balor Brown. The skulls and bones were then painted with GW Screaming Skull.


Next, all of the sand and bones were washed with brown ink.


When the ink wash was dry, the sand was then drybrushed with P3 Gun Corps Brown. The skulls and bones were given a careful drybrush of Screaming Skull mixed with a little brown ink so the color didn't get too bright too fast.


The skulls were finished off with an overbrushing of Screaming Skull and then a little P3 Menoth White Highlight. The sand was also drybrushed with a little Screaming Skull.


All of the wrought iron was base coated with black, and then drybrushed very lightly with P3 Pig Iron. A few brighter spots of exposed metal were created by dabbing the Pig Iron in a few places. All of the metal was then washed with P3 Bloodstone and a few patches of P3 Khador Red Highlight (also known as "orange") were stippled in to add variety to the rust color.


I've never been a fan of modeled foliage, so I decided to cover all of the rose bushes with leafy ivy. I used Army Painter Poison Ivy, and two packs were enough to cover all of the leafy areas in the entire set.


After painting the plants GW Castallan Green (ignoring the roses) and then washing them with brown ink, I applied the ivy. The material was cut to shape with scissors and attached with super glue.


A few of the remaining details like the candles were painted and static grass was added to the base. At long last, my Garden of Morr was finished!


Getting the ivy in some of the tight spaces required gluing in a few smaller pieces, rather than attempting to attach the whole patch in one go.


The roof of the tall mausoleum was base coated with 50/50 Greatcoat Grey and Shadow Grey and then carefully drybrushed with Shadow Grey, and then 50/50 Shadow Grey and Screaming Skull.


Some of those spikes are just begging to be snapped off. If any of them go I'll pin them back in place. (I already knocked the spire off the top of the tall mausoleum!)


The weathering was crated by painting streaks of Formula P3 Bloodstone on the roofs and down the sides of the mausoleums. Some thin brown ink was washed around the bases of the buildings and the crypt covers.


The small crypt opens and closes, revealing the corpse inside!


Now to try out some of the Haunted Battlefield terrain rules in Warhammer: Nagash...


'Til next time!

Modeling and Painting: Dire Wolves, Part 2

Welcome back! It's been a long two weeks, filled with commissions, freelance work, and disaster recovery. I appreciate the concern some of you have expressed through Facebook and email. My wife and family have been fortunate to come through the storm with no damage, and we didn't even lose power. Still, it's difficult not to be affected by such widespread destruction, and I took some time out to donate supplies and volunteer with the cleanup effort.


This week, we've got the second half of the dire wolf tutorial: the painting.


In this painting guide, I use the classic GW Brown Ink quite heavily. I experimented with the Agrax Earthshade, but it just didn't have enough pigment to get the effect I was going for. If you're trying to replicate the process described here, in lieu of GW Brown Ink, I'd recommend thinned brown india ink or a chestnut ink, darkened with a drop of black (just enough to cut the chestnut red tint and make it brown).


For each color listed, I label it as a P3 color or a GW color (with it's classic name and new name). This is intended to be an assembly line process for painting large units, so I'm painting all three converted models, side by side in each step.


Basecoating and Washing


Start by priming the models black.


Basecoat the sand with a thin layer of GW Snakebite Leather/ Balor Brown.


Basecoat the Fur with GW Codex Grey/ Dawnstone, mixed with a little black (something like a 70/30 ratio.) Basecoat the skin on the legs, ribs and faces with a 50/50 mix of Codex/ Dawnstone and P3 Battlefield Brown. Basecoat the Skulls on the base with GW Bleached Bone/ Screaming Skull.


Next, wash the entire model with GW Brown Ink. Add some spots of P3 Armor Wash, thinned with a little water into the fur.


When the ink is completely dry, finish the base sand by drybrushing with successive layers of P3 Gun Corps Brown, Snakebite/ Balor Brown, and Bleached Bone/ Screaming Skull. Don't worry about the skulls on the base at this point; we'll address them when finishing off the wolves' faces.


Painting the Fur


The fur can be simply drybrushed, but it's too easy for the paint to become chalky and clog up the texture. I prefer an organic process using a series of thin drybrush layers and washes to get a rich, varied tone to the fur. 


It's important that you don't let the paint get too dry in your brush; that's how the chalkiness occurs. If you find the drybrushed highlights getting too bright or filling in the recesses, you can always add a thin wash overtop to darken it. Then dryrush back up. I think on my first batch of wolves I went back and forth a dozen times, but after 30 wolves, I've got it dialed in: 


Drybrush Codex/ Dawnstone over the fur, recapturing the grey color.


Add a little Bleached Bone/ Screaming Skull into the grey and drybrush some highlights over the fur.


Add a thinned wash of Brown Ink over the fur, and then spot in some thinned Armor Wash. You don't want to darken the fur as much as the initial brown wash did.


Drybrush lightly with the Codex/ Dawnstone and Bleached Bone/ Screaming Skull mix. Then add a few hits of GW Fortress/ Administratum Grey.


Painting the Skin 


Mix 50/50 Codex Grey/ Dawnstone and Battlefield Brown. Drybrush this over the areas of skin (ears and faces, too). Use a small drybrush to keep things pretty controlled.


Then paint highlights with straight Codex Grey/ Dawnstone. Use a sharp brush, and just hit the raised edges. Paint the edges of the torn flesh on the wolve's faces, and add a highlight line on the edges of the ears.


Painting the Faces


Basecoat the bone areas with Bleached Bone/ Screaming Skull. Get the skulls on the base, as well.


Wash the bone with a mix of Brown Ink and Snakebite Leather (about 70/30). After the ink dries, Drybrush the edges with a mix of Bleached Bone/ Screaming Skull and P3 Menoth White Highlighht. As with the fur, don't let the highlights get too bright; it they do, wash on some thin brown ink to shade it.


Paint straight P3 Skorne Red into the meaty areas, and around the edge of the exposed skull and torn flesh. Don't forget the tongues. Keep it pretty spotty; you don't want these to be too bloody. (Or do you...?)


Then, wash over the bloody areas with Brown Ink to shade it.


Finally, add a dot of P3 Khador Red Base in the eyes, and paint the claws and any intact noses with Black Ink or Armor Wash. (I use the ink rather than black paint because it has a slight translucency that eliminates the need to highlight it.)


Finally, paint the sides of the base with Model Masters Medium Green, add static grass, and they're finished!


Here's a close-up of the face, step-by-step:


The new Doom Wolves are finished as well. Here's a before and after comparison of the sculpted head detail:


And the running wolf:


I can't tell you how much of a relief is is to finally have these off my painting table, and to be able to field multiple units of dire wolves. Now it's off to war!


'Til next time!

Older Post ►
 

Copyright 2011 My Unique Hobby is proudly powered by blogger.com